
-> ACEBTKEY USER MANUAL<-
Introduction
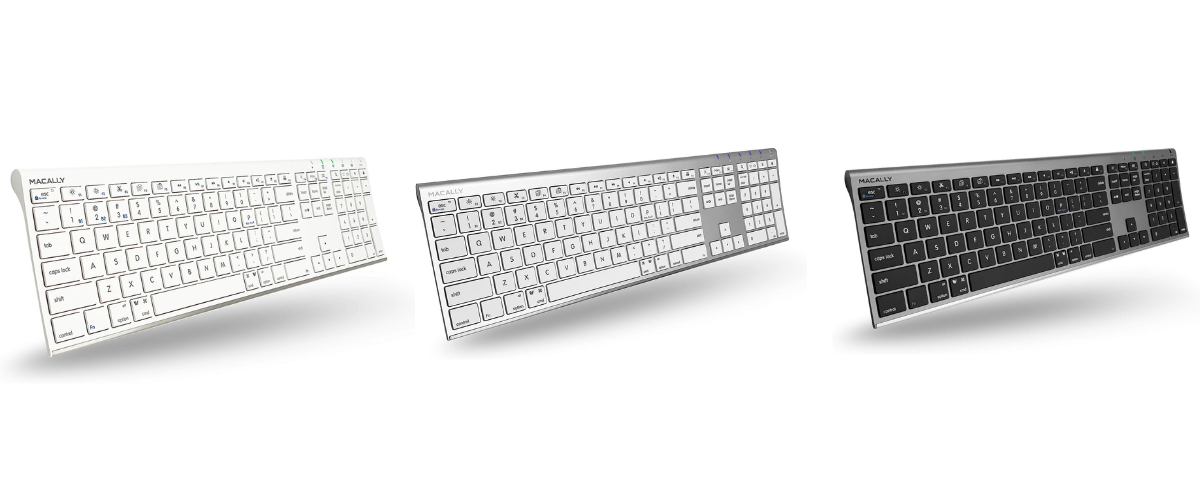
This guide will assist you in how or what this keyboard is capable of. There are three different variants for this product.
What is the difference?
ACEBTKEY: White top and white keycaps
ACEBTKEYA: Silver top and white keycaps
ACEBTKEYSG: Space Grey top and black keycaps
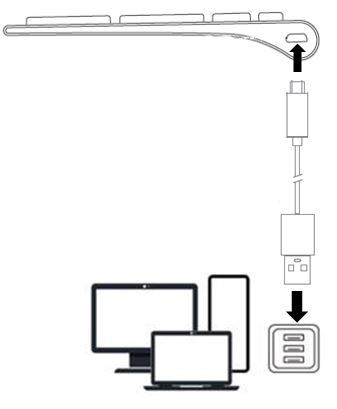
Where is the charging cable located and how to change it?
The charging cable is in the package. When you first open the package there will be an opening and you will see the cable there. The cable will be a Micro-USB on one end and USB-A on the other. In the future, it will be changed to USB-C on one end and USB-A on the other. The newer updated version (when it arrives will be USB-C to USB-A).
Top three tips and a note
Tip 1: Charging it using a wall adapter will be more efficient. The only way it will not charge is either, your power company turns the power off or if it is fully charged.
Tip 2: You can charge while using this keyboard. Just turn the keyboard off and charge it using a wall adapter. Once the computer is turned off or goes to sleep there will be little to no power going into the hubs of the computer.
Tip 3: When you turn your computer off while you are sleeping. Please turn the keyboard off so it can charge better.
Note: The newer versions will have a USB-C port instead of a Micro-USB port.
What are the symbols on the LED underneath the LED lights?
There are five LED light indicators shown below. This will tell you what the symbols mean and what does. The color will also be listed below the picture.
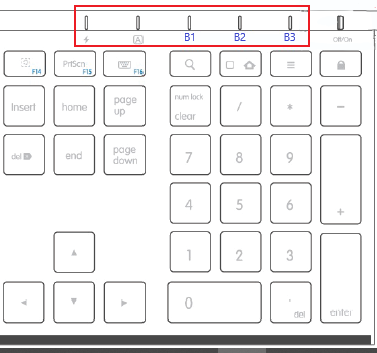
Symbols and LED light colors (From left to right):
Thunder icon: Charging Indicator. Color: Charging: Red Fully Charged: Green
"A" in a square icon: Caps Lock Indicator. Color: Green
B1 icon: Bluetooth channel 1. Color: Blue
B2 icon: Bluetooth channel 2. Color: Blue
B3 icon: Bluetooth channel 3. Color: Blue
Note: Off/On switch is not an LED.
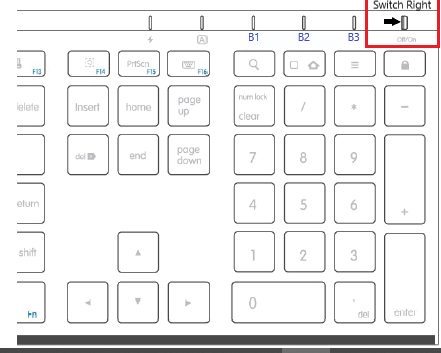
How do I turn the keyboard on or off
On the top right of the keyboard, you should see a series of LED lights. On the far right, there will be an On/Off switch. Push the tab to the right so the keyboard will turn on. The picture is shown below:
Two Important tips:
Important tip 1: Turn off your keyboard when you finish using it. It will conserve battery.
Important tip 2: Turn off your keyboard when you are using a wall adapter. It will charge more efficiently.
How to pair three devices with this keyboard?
*Note 1: The devices may vary from customer to customer. I will give an example of pairing this keyboard with an iMac Studio, Windows, and iPad.
*Note 2: Depending on your OS version. Mac Os Ventura + will be called System Settings. Mac OS Monterey and lower will be called System Preferences.
*Please note that the instructions may vary if you are using a Windows computer or tablet.
To pair with B1 with an iMac Studio: IF the B1 LED light flashes rapidly when the keyboard is turned on:
1) The keyboard should be turned on already.
2) Go to System Preferences/Settings
3) Click on "Bluetooth" Note: Do not click on "Keyboard"
4) The B1 LED light should be blinking rapidly (blink-blink-blink-blink)
5) Click on Connect and you are all set.
*Note: Sometimes when you finish pairing, you should get a pop-up for Keyboard Set-Up Assistant. If it does not then you will need to click on the following: "System Preferences/Setting" > Click on "Keyboard" > Click on "Change Keyboard Type"
When the keyboard set-up assistant pops up:
*Note: This is only for iMac, Macbook series, Mac Studio, and Mac Mini
1) Click on "Continue"
2) When it says to press the key immediately to the right side of the left shift key press the "Z" key on the ACEBTKEY Series keyboard.
3) When it says to press the key immediately to the left side of the right shift key press the "?/" key on the ACEBTKEY Series keyboard.
4) Click on "ANSI"
5) Click on "Done"
To pair B2 with a Windows: (Assuming that B1 is already paired)
1) Keyboard should be on
2) Click on the "Windows Icon" then click on "Settings"
3) Click on "Devices" then click on "Add Bluetooth or other devices" After the "Add a device" window will pop up. Click on "Bluetooth"
4) On the Macally keyboard, Press and hold the Fn key. While holding it press the number 2 on the number row (on the left side of the keyboard)
5) The B2 LED light will flash once then press and hold the Fn key and while holding it press P and let go of both. The blue LED will start flashing rapidly. (blink-blink-blink-blink)
6) Click on "Connect" and you should be all set.
To pair B3 with an iPad: (Assuming that B2 is already paired)
1) Keyboard should be on
2) Tap on the "Settings" icon
3) Tap on "Bluetooth"
4) On the Macally keyboard, Press and hold the Fn key. While holding it press the number 2 on the number row (on the left side of the keyboard)
5) The B3 LED light will flash once then press and hold the Fn key and while holding it press P and let go of both. The blue LED will start flashing rapidly. (blink-blink-blink-blink)
6) Tap on the name in the device list and you should be all set.
How to turn on Numeric Key Pad:
*Note: There are multiple ways to turn the Num Lock LED lights for a Windows computer. There is only one way for Mac however, the steps may be different depending on the operating system. Windows on the other hand has 4 different methods.
Mac
Older OS:
System Preferences > Acessibilities > Mouse and Trackpad > Uncheck Enable Mouse Keys
Newer OS:
System Preferences > Acessibilities > Pointer Control > Alternate Control Methods > Uncheck Enable Mouse Keys
Windows
Method 1: On-Screen Keyboard (Turn Num Lock On)
Control+Windows+O > Click on "Options" > Click on "Show Numeric Keypad" > Click on "Num Lock" > Close the On-Screen Keyboard.
Method 2: Disable mouse keys in Ease of Access (Mouse)
Click on the "Windows" icon > Click on "Settings" > Click on "Ease of Access" > Click on "Mouse" > Under "Control your mouse with a keypad" > Make sure that Turn on mouse keys is off.
Method 3: Disable mouse keys in the Ease of Access Center (Mouse)
Click on the "Windows" icon > Type "Control Panel" in the search bar and select it > Click on "Ease of Access Center" > Click on "Make the mouse easier to use" > Under control the mouse with the keyboard uncheck "Turn on Mouse Keys"
Method 4: Disable mouse keys in the Ease of Access Center (Keyboard)
Click on the "Windows" icon > Type "Control Panel" in the search bar and select it > Click on "Ease of Access Center" > Click on "Make the keyboard easier to use" > Under control the mouse with the keyboard uncheck "Turn on Mouse Keys"